Some editions of Windows 7, i.e. Windows 7 Ultimate and Windows 7 Enterprise can officially more than one display language, which determines what localized languages are been used to display text in wizards, dialog boxes, menus, Help and Support topics, and other objects in the user interface (UI). Display languages can be added and installed in Windows 7 with MIU (Multilingual User Interface) or LIP (Language Interface Pack) language packs.
Other than directly change display language after installing new display language, when there is more than one display languages installed on Windows 7 system, users can change and switch display language manually or on ad-hoc basis using steps below.
How to Change the Display Language in Windows 7
- Click on Start button, then go to Control Panel.
- In Category view, click on Clock, Language, and Region link, and then click on Change display language link under “Region and Language” section.

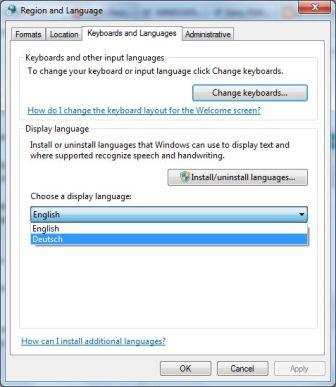
In Icons view, click on Region and Language icon, and then go to Keyboards and Languages tab.
- Under “Display language” section, choose a display language from the list of installed language packs.

Note: If no list of display languages is shown, make sure that you have installed additional language packs as the list will only applicable if there is more than 1 display languages available in supported editions of Windows 7.
- Click Apply.
The system’s user interface is now been converted and switched to new display language selected. Logout and login again or restart computer to see the change. Note that the new display language is applied for existing user account only, but not to text on welcome screen and system reserved accounts, nor set as the default display language for new user accounts create in future.
To change the display language in Windows 7 welcome screen and special reserved system accounts used by Windows services (local system, local service, and network service), and set the current display language as the setting for new user created, continue with steps below. It will also set current display set as the display language for users who haven’t specified a display language.
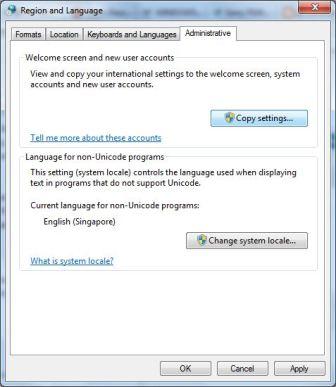
- In the “Region and Language” dialog window, click on Administrative tab.
- Under “Welcome screen and new user accounts” section, click on Copy settings button.

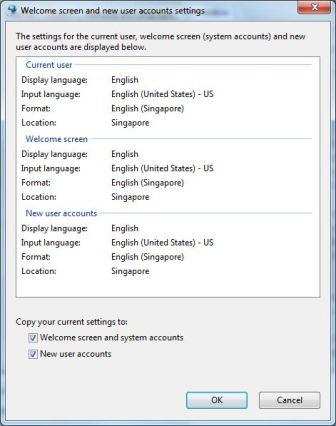
- In the “Welcome screen and new user accounts” dialog box, select and tick the check boxes for Welcome screen and system accounts and New user accounts.

- Click OK to apply the change.
Recent Posts
- Able2Extract Professional 11 Review – A Powerful PDF Tool
- How to Install Windows 10 & Windows 8.1 with Local Account (Bypass Microsoft Account Sign In)
- How to Upgrade CentOS/Red Hat/Fedora Linux Kernel (cPanel WHM)
- How to Install Popcorn Time Movies & TV Shows Streaming App on iOS (iPhone & iPad) With No Jailbreak
- Stream & Watch Free Torrent Movies & TV Series on iOS with Movie Box (No Jailbreak)
 Tip and Trick
- How To Download HBO Shows On iPhone, iPad Through Apple TV App
- Windows 10 Insider Preview Build 19025 (20H1) for PC Official Available for Insiders in Fast Ring – Here’s What’s News, Fixes, and Enhancement Changelog
- Kaspersky Total Security 2020 Free Download With License Serial Key
- Steganos Privacy Suite 19 Free Download With Genuine License Key
- Zemana AntiMalware Premium Free Download For Limited Time