We can easily running out of disk space if we keep on saving files without performing disk clean up from time to time or move them to external storage device. In order to avoid such incident from happening, proper control of disk usage is important and Windows Vista has a feature that allows you to set quota of disk space usage besides triggering you when the warning limit is being hit.
To enable disk quota, follow below steps:
1. Go to Start, then click Computer.
2. Right click on the volume that you want to enable disk quota, then select Properties.
3. Under Quota tab, click Show Quota Setting button.
4. Click Continue when UAC is displayed.
5. Check Enable Quota Management checkbox, then follow by Deny disk space to users exceeding quota limit.
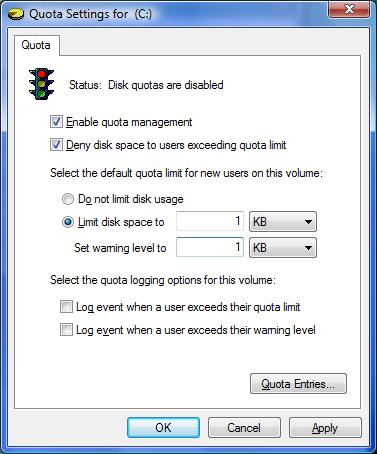
6. Select Limit disk space to radio button, then configure your desired disk space amount which you want it to be limited to.
7. Configure your desired warning disk space amount.
8. Click OK button to save the setting.
Hopefully this simple steps will keep your Windows system optimized with sufficient memory space for smooth daily operation.
 Tip and Trick
- How To Download HBO Shows On iPhone, iPad Through Apple TV App
- Windows 10 Insider Preview Build 19025 (20H1) for PC Official Available for Insiders in Fast Ring – Here’s What’s News, Fixes, and Enhancement Changelog
- Kaspersky Total Security 2020 Free Download With License Serial Key
- Steganos Privacy Suite 19 Free Download With Genuine License Key
- Zemana AntiMalware Premium Free Download For Limited Time