Windows operating system uses MTU (Maximum Transmission Unit) determines the maximum size of the largest protocol data packet unit (including the size of the transport header) that can be transmitted over the underlying network layer. MTU parameters usually appear in association with a communications interface (NIC, serial port, etc.), and is configured separately for each network interface.
For optimum network performance and to prevent fragmentation, the MTU should be large enough to hold any IP datagram in a single frame. IP datagrams larger than the MTU are divided into fragments whose size is a multiple of eight octets. The fragments travel separately to the destination computer, where they are reassembled before the datagram is processed. As a result, a low MTU value is not necessarily the best choice for optimal network performance.
According to Microsoft, Windows 7 and Windows Vista TCP/IP stack has the capability to automatically detect and determine the optimum value of largest MTU that the interface can transmit at connect time for all interfaces, if the value of the EnablePMTUDiscovery registry key is set to enable. The default setting in Windows is indeed enabled for EnablePMTUDiscovery to allow auto discovery of MTU size. Thus, the system will uses the detected MTU for transmissions.
Though Windows can automatically set a proper and optimal MTU for the network interface, user can still adjust and change the MTU value that TCP/IP uses for the network interface. Some user may want to change the MTU size as the dynamically determined value does not compatible with the network media, especially when dealing with modem and router for ADSL, Dial-Up or VPN connection. The manually set or configure MTU size will take precedence over the MTU that the network adapter detects dynamically.
In Windows Vista and Windows Vista, MTU can be easily viewed or changed with the “netsh” command. To run the “netsh” command, user need so to open an elevated Command Prompt window as Administrator.
Note that MTU is set on each of the network interfaces on the computer. Thus, it’s imperative to find out what network interfaces user has on the computer, and which interface is in used. Use the following command to show all network interfaces available:
netsh interface ipv4 show subinterfaces
To change or set a new MTU value, execute the following command:
netsh interface ipv4 set subinterface "Local Area Connection" mtu=nnnn store=persistent
Where “Local Area Connection” (including quotation marks as there is space in the name) is the name of the network connection on the computer, which is shown in the listing of network interfaces available. Common network connection name for Wi-Fi access is “Wireless Network Connection”.
In addition, nnnn should be replaced with numeric value of the preferred size of MTU, with minimum of 576 for IPv4 and 1280 for IPv6. Note that if a value greater than the dynamically-determined MTU, the system uses the value of the dynamically-determined MTU instead. Thus, change of MTU is normally to reduce and reduce, but not to increase, the size of the MTU.
If you want to change the MTU for ipv6 network interface, change the ipv4 in commands above to ipv6.
After the change, reboot and restart the computer for the change to take effect.
To verify the change of MTU has been successfully saved, use the following command:
netsh int ip show int
Which will return the response similar to the following:
Idx     Met         MTU          State                Name
---  ----------  ----------  ------------  ---------------------------
  1          50  4294967295  connected     Loopback Pseudo-Interface 1
 12          20        1480  connected     Wireless Network Connection
 15           5        1500  disconnected  Local Area Connection
The following command also works:
netsh interface ipv4 show subinterfaces
Replace ipv4 with ipv6 if necessary. The command will return the response similar to the following:
   MTU  MediaSenseState   Bytes In  Bytes Out  Interface
------  ---------------  ---------  ---------  -------------
4294967295                1          0      15216  Loopback Pseudo-Interface 1
  1500                1   27058054   26391727  Wireless Network Connection
  1500                5          0          0  Local Area Connection
Alternative (Registry Editor):
It’s also possible to directly modify the system registry to edit the MTU value. The problem with direct registry modification is that there is no descriptive name shown in the registry for the network interface, so you have to judge or guess which registry entry represents the network interface which MTU you want to change.
- Run Registry Editor (RegEdit).
- Navigate to the following registry key:
HKEY_LOCAL_MACHINE\System\CurrentControlSet\Services\Tcpip\Parameters\Interfaces
- Select the registry sub-key of the network interface that you want to change its MTU. For example, {ABCD1234-EF56-GH78-IJ90-KLMNOP123456}. As a guide, you can look through the list of interface available, and find the one that has IP address or gateway IP address which is matching.
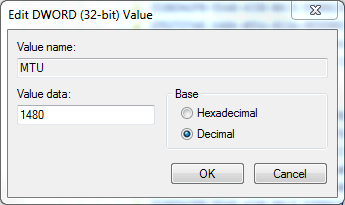
- Right click on blank area of the right pane, and select New -> DWORD (32-bit) Value, and name the new registry value as MTU
- Right click on MTU and select Modify, and enter the desired MTU value in Decimal. Common MTU values in decimal are 1300, 1400, 1462, 1480, and 1500.

- Click OK to set the new MTU.
- Exit Registry Editor and restart the computer.
Recent Posts
- Able2Extract Professional 11 Review – A Powerful PDF Tool
- How to Install Windows 10 & Windows 8.1 with Local Account (Bypass Microsoft Account Sign In)
- How to Upgrade CentOS/Red Hat/Fedora Linux Kernel (cPanel WHM)
- How to Install Popcorn Time Movies & TV Shows Streaming App on iOS (iPhone & iPad) With No Jailbreak
- Stream & Watch Free Torrent Movies & TV Series on iOS with Movie Box (No Jailbreak)
 Tip and Trick
- How To Download HBO Shows On iPhone, iPad Through Apple TV App
- Windows 10 Insider Preview Build 19025 (20H1) for PC Official Available for Insiders in Fast Ring – Here’s What’s News, Fixes, and Enhancement Changelog
- Kaspersky Total Security 2020 Free Download With License Serial Key
- Steganos Privacy Suite 19 Free Download With Genuine License Key
- Zemana AntiMalware Premium Free Download For Limited Time