Security has been a buzz word in modern computing and especially in Windows operating system, which its relatively open environment made Windows prone to accidental deletion, corruption, virus infection and malicious attacks of system files. To protect the system files, Windows assigns TrustedInstaller as the only owner with full control permissions, with all other administrator or user accounts including SYSTEM and CREATOR OWNER been granted rights with only read, execute or traverse permissions only.
So if you want to perform a hack on the system files, or to rename, edit, and delete the system files, you must first take ownership and get full control access permissions for your user account or group.
In addition, if you plug in a hard disk drive installed on another system, the permissions may get messed up too even if you are having the same user account name in the same group, as the hashed identifier may be different on different computer. In such cases, the ownership and the permissions of the drive and its files and folders have to be changed too.
How to Take Ownership and Grant Full Control Permissions in Windows
- In Windows Explorer, navigate and locate the file or folder which you want to take ownership and has full read write control access permission on.
- Right click on the file or folder (directory), and click Properties.

- On the File/Folder Properties dialog box, go to Security tab.
- Click on Advanced button.
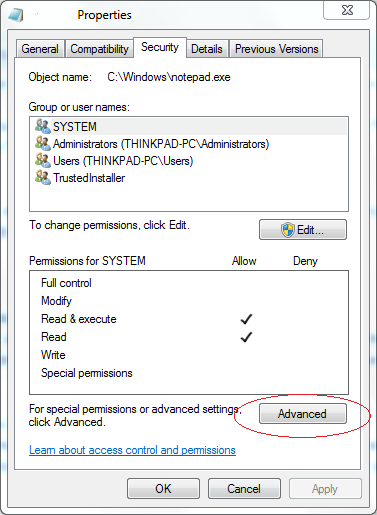
- In “Advanced Security Settings” dialog window, click on Owner tab, which will indicates the current owner as TrustedInstaller or some other user account.
- Click on the Edit button.
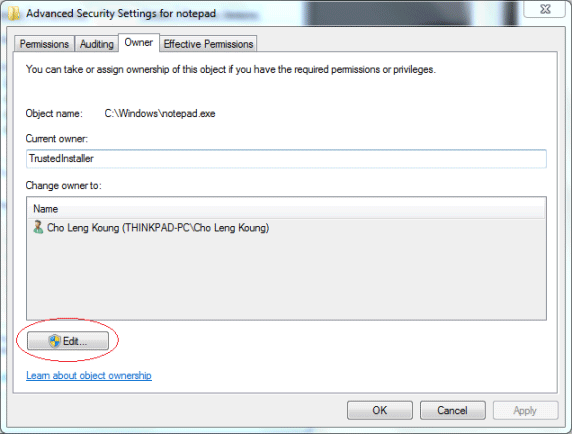
Note: Press Continue or enter user name and password of administrator account if User Account Control prompts for permission to continue.
- Another “Advanced Security Settings” dialog will appear. Select to highlight the user account or group (for example, Administrators) in the Change owner to box that you want to assign as the owner for the object.
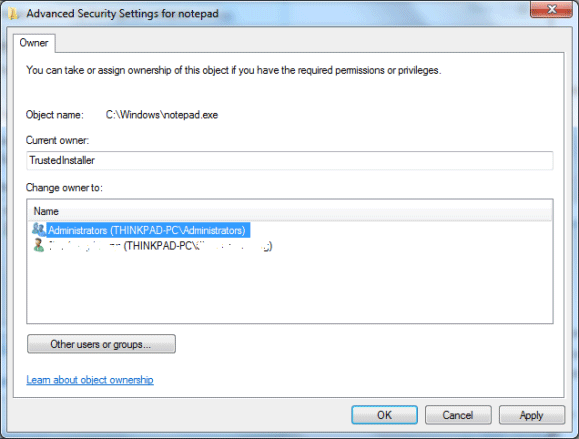
If the user or group that you want to select does not appear automatically, click on “Other users or groups” button to locate it.
- Click OK to make the change.
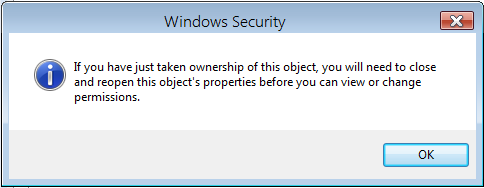
If you’re prompted with notice that you have just taken ownership of this object, and need to close and reopen this object’s properties before you can view and change permissions dialog box, click OK.
- Click OK to exit from all Properties dialog boxes.
- Repeat step 1 to step 3 to open the object’s Properties dialog box again.
- Under “Security” tab, click on Edit button to change permissions.
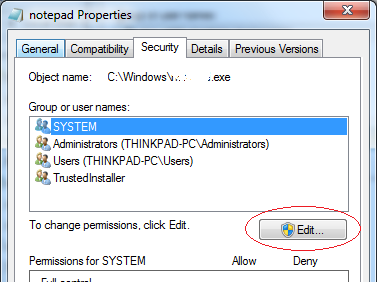
Note: Press Continue or enter user name and password of administrator account if User Account Control prompts for permission to continue.
- Click and highlight the Administrators or the user who wants the permissions on the object be changed in the “Group or user names” box.
If the user ID or group that you want to manage the permissions for the object doesn’t exist, click on “Add” to manually enter or search for the user account.
- In the Permissions for <user or group account> box, click on Full Control check box under the Allow to assign full read-write access control permissions to the user or group.
When selecting Full Control, all checkboxes for “Allow” column will automatically selected except “Special Permissions”. You can select any other permissions that you want to grant by selecting other check boxes as desire.
- Click OK when done to close off all object’s Properties dialog boxes.
- The file or folder now belongs to you with full control permissions.
Alternative 1: Take Ownership and Gain Read-Write Permissions via Command Prompt
It’s also possible to issue commands in Command Prompt to take ownership and assign full control permissions:
- Open an Command Prompt as Administrator.
- Issue and execute (press Enter) the following commands:
For Files:
takeown /f <file name> /d y

icacls<file name> /grant administrators:F
For Folders or Directories (will perform action recursively):
takeown /f <directory name> /r /d y
icacls <directory name> /grant administrators:F /tReplace <file name> or <directory name> with actual file name or folder name, with full path to the file if you’re not changing directory to the same folder with the file or folder.
The first “takeown” command will take ownership of the file or folder specified, and the second “icacls” command will grant full control permissions to administrators user group. Thus, if you’re assign to other user account or group, change “administrators” to the desired user name or group name accordingly.
Note that when using command for folders, to command will run recursively. To prevent the task been perform recursively, remove the “/r” (from takeown) and “/t” (from icacls) switch.
Alternative 2: Take Ownership and Assign Full Control Permissions with Batch Script
A batch script has been created which based on command-line commands above, saving users the need to remember and type long commands.
Download TakeControlOf.zip (registration on MDL Forums required).
TakeControlOf.cmd makes use of takeown (takes ownership of a file or directory) and icacls (sets new ACLs on a files or directory) respectively to set owner and grant Full Control privilege to Administrators group, recursively (if you specify a folder). You need to manually edit the script if you decide to use another user or group account, or remove the “/r” (from takeown) and “/t” (from icacls) parameter for non-recursive usage.
To use the batch script, simply open an elevated Command Prompt as Administrator, and execute the command with the following syntax:
TakeControlOf <x:\full\path\to\file or directory name>
For example,
TakeControlOf C:\Windows\Test_File.exe
TakeControlOf C:\Test_Directory
If you’re not in the directory which TakeControlOf.cmd batch script file is saved, you need to enter the full path to the batch file too.
Alternative 3: Add Take Control and Ownership Function to Right Click Context Menu
This is probably easiest method to take ownership and full control of any file or folder, by just right click and select a command in the right click menu. However, users first need to add the Take Ownership and Grant Full Control function to the right click menu. To do so, save the following code into a text file, and name it with a file name with .reg extension.
Windows Registry Editor Version 5.00
[HKEY_CLASSES_ROOT\*\shell\runas]
@="Take Ownership"

"NoWorkingDirectory"=""
[HKEY_CLASSES_ROOT\*\shell\runas\command]
@="cmd.exe /c takeown /f \"%1\" && icacls \"%1\" /grant administrators:F"

"IsolatedCommand"="cmd.exe /c takeown /f \"%1\" && icacls \"%1\" /grant administrators:F"
[HKEY_CLASSES_ROOT\Directory\shell\runas]
@="Take Ownership"

"NoWorkingDirectory"=""
[HKEY_CLASSES_ROOT\Directory\shell\runas\command]
@="cmd.exe /c takeown /f \"%1\" /r /d y && icacls \"%1\" /grant administrators:F /t"

"IsolatedCommand"="cmd.exe /c takeown /f \"%1\" /r /d y && icacls \"%1\" /grant administrators:F /t"
Or, just download the prepared registry registration file: TakeOwnership.zip
Run the .reg file (InstallTakeOwnership.reg from downloaded ZIP) to merge and install the necessary registry keys. A RemoveTakeOwnership.reg is available for people who wants to remove the right click menu items in future.
To take ownership and gain full control permissions, just right click on the file or folder, and click on Take Ownership. Again, for folders, the command will work recursively.
All the tricks above should works in Windows Vista, Windows 7, Windows Server 2008, Windows Server 2008 R2, Windows 8 and even future versions of Windows OS.